SpringMVC 初始化流程分析
  • 2023-04-30 14:23:22
  • 4984 热度
  • 0 评论

[TOC]

框架源码是我们 Coding 晋级中的必修课,SSM 应该算是小伙伴们日常接触最多的框架了,这其中 SpringMVC 初始化流程相对来说要简单一些,因此今天無名就先来和大家分析一下 SpringMVC 初始化流程。

即使你没看过 SpringMVC 的源码,估计也听说过:DispatcherServlet 是 SpringMVC 的大脑,它负责整个 SpringMVC 的调度工作,是 SpringMVC 中最最核心的类,SpringMVC 整个顶层架构设计都体现在这里,所以搞明白 DispatcherServlet 的源码,基本上 SpringMVC 的工作原理也就了然于胸了。

然而 DispatcherServlet 继承自 FrameworkServlet,FrameworkServlet 又继承自 HttpServletBean,如下图:

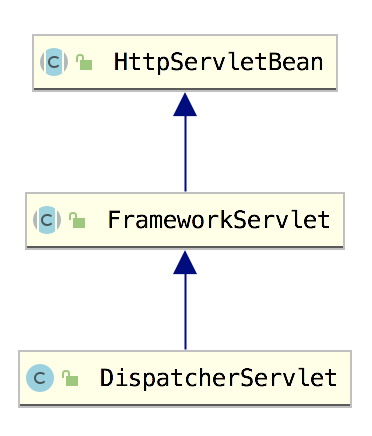
因此我们的分析就从 HttpServletBean 开始。

1.HttpServletBean

HttpServletBean 继承自 HttpServlet,它负责将 init-param 中的参数注入到当前 Servlet 实例的属性中,同时也为子类提供了增加 requiredProperties 的能力,需要注意的是 HttpServletBean 并不依赖于 Spring 容器。

大家知道,HttpServlet 的初始化是从 init 方法开始的,所以我们就先从 HttpServletBean 的 init 方法开始看起:

1
2
3
4
5
6
7
8
9
10
11
12
13
14
15
16
17
18
19
20
21
22
@Override
public final void init() throws ServletException {
// Set bean properties from init parameters.
PropertyValues pvs = new ServletConfigPropertyValues(getServletConfig(), this.requiredProperties);
if (!pvs.isEmpty()) {
try {
BeanWrapper bw = PropertyAccessorFactory.forBeanPropertyAccess(this);
ResourceLoader resourceLoader = new ServletContextResourceLoader(getServletContext());
bw.registerCustomEditor(Resource.class, new ResourceEditor(resourceLoader, getEnvironment()));
initBeanWrapper(bw);
bw.setPropertyValues(pvs, true);
}
catch (BeansException ex) {
if (logger.isErrorEnabled()) {
logger.error("Failed to set bean properties on servlet '" + getServletName() + "'", ex);
}
throw ex;
}
}
// Let subclasses do whatever initialization they like.
initServletBean();
}

在这个方法里,首先获取到 Servlet 的所有配置并转为 PropertyValues,然后通过 BeanWrapper 修改目标 Servlet 的相关属性。BeanWrapper 是 Spring 中提供一个工具,使用它可以修改一个对象的属性,像下面这样:

1
2
3
4
5
6
7
8
9
10
public class Main {
public static void main(String[] args) {
User user = new User();
BeanWrapper beanWrapper = PropertyAccessorFactory.forBeanPropertyAccess(user);
beanWrapper.setPropertyValue("username", "itboyhub");
PropertyValue pv = new PropertyValue("address", "www.itboyhub.com");
beanWrapper.setPropertyValue(pv);
System.out.println("user = " + user);
}
}

最终输出:

1
user = User{username='itboyhub', address='www.itboyhub.com'}

所以前面的 bw 实际上就代表当前 DispatcherServlet 对象。

通过 BeanWrapper 修改目标 Servlet 的相关属性时,有一个 initBeanWrapper 方法是空方法,开发者如有需要可以在子类中实现该方法,并且完成一些初始化操作。

属性配置完成后,最终调用 initServletBean 方法进行 Servlet 初始化,然而该方法也是一个空方法,在子类中实现。

这就是 HttpServletBean 所做的事情,比较简单,加载 Servlet 相关属性并设置给当前 Servlet 对象,然后调用 initServletBean 方法继续完成 Servlet 的初始化操作。

2.FrameworkServlet

从前面的介绍可知,FrameworkServlet 初始化的入口方法就是 initServletBean,因此我们就从 FrameworkServlet#initServletBean 方法开始看起:

1
2
3
4
5
6
7
8
9
10
11
@Override
protected final void initServletBean() throws ServletException {
//省略...
try {
this.webApplicationContext = initWebApplicationContext();
initFrameworkServlet();
}
catch (ServletException | RuntimeException ex) {
//省略...
}
}

这个方法原本挺长的,但是抛开日志打印异常抛出,剩下的核心代码其实就两行:

  1. initWebApplicationContext 方法用来初始化 WebApplicationContext。
  2. initFrameworkServlet 方法用来初始化 FrameworkServlet,但是这个方法是一个空方法,没有具体的实现。本来子类可以重写该方法做一些初始化操作,但是实际上子类并没有重写该方法,所以这个方法我们就暂且忽略之,不去分析了。

那么这里最为重要的其实就是 initWebApplicationContext 方法了,我们一起来看下:

1
2
3
4
5
6
7
8
9
10
11
12
13
14
15
16
17
18
19
20
21
22
23
24
25
26
27
28
29
30
31
32
33
protected WebApplicationContext initWebApplicationContext() {
WebApplicationContext rootContext =
WebApplicationContextUtils.getWebApplicationContext(getServletContext());
WebApplicationContext wac = null;
if (this.webApplicationContext != null) {
wac = this.webApplicationContext;
if (wac instanceof ConfigurableWebApplicationContext) {
ConfigurableWebApplicationContext cwac = (ConfigurableWebApplicationContext) wac;
if (!cwac.isActive()) {
if (cwac.getParent() == null) {
cwac.setParent(rootContext);
}
configureAndRefreshWebApplicationContext(cwac);
}
}
}
if (wac == null) {
wac = findWebApplicationContext();
}
if (wac == null) {
wac = createWebApplicationContext(rootContext);
}
if (!this.refreshEventReceived) {
synchronized (this.onRefreshMonitor) {
onRefresh(wac);
}
}
if (this.publishContext) {
String attrName = getServletContextAttributeName();
getServletContext().setAttribute(attrName, wac);
}
return wac;
}

这里的逻辑也比较清晰:

  1. 首先获取 rootContext。在默认情况下,Spring 会将容器设置为 ServletContext 的一个属性,属性的 key 为 org.springframework.web.context.WebApplicationContext.ROOT,所以根据这个 key 就可以调用 ServletContext#getAttribute 方法获取到 rootContext 了。
  2. 获取 WebApplicationContext 实例,也就是给 wac 变量赋值的过程,这里存在三种可能性:1.如果已经通过构造方法给 webApplicationContext 赋值了,则直接将其赋给 wac 变量,同时,如果需要设置 parent 就设置,需要刷新就刷新。这种方式适用于 Servlet3.0 以后的环境,因为从 Servlet3.0 开始,才支持直接调用 ServletContext.addServlet 方法去注册 Servlet,手动注册的时候就可以使用自己提前准备好的 WebApplicationContext 了,这块無名在我录制的 Spring Boot 视频中也讲过,感兴趣的小伙伴可以在公众号后台回复 vhr 查看视频详情;2.如果第一步没能成功给 wac 赋值,那么调用 findWebApplicationContext 方法尝试去 ServletContext 中查找 WebApplicationContext 对象,找到了就赋值给 wac;3.如果第二步没能成功给 wac 赋值,那么调用 createWebApplicationContext 方法创建一个 WebApplicationContext 对象并赋值给 wac,一般来说都是通过这种方式创建的 WebApplicationContext。这三套组合拳下来,wac 肯定是有值了。
  3. 当 ContextRefreshedEvent 事件没有触发时,调用 onRefresh 方法完成容器刷新(由于第一种和第三种获取 WebApplicationContext 的方式最终都会调用 configureAndRefreshWebApplicationContext 方法,然后发布事件,再将 refreshEventReceived 变量标记为 true,所以实际上只有第二种方式获取 wac 实例的时候,这里才会刷新,具体可以看下文分析)。
  4. 最后将 wac 保存到到 ServletContext 中。保存的时候会根据 publishContext 变量的值来决定是否保存,publishContext 可以在 web.xml 中配置 Servlet 时通过 init-param 进行配置,保存的目的是为了方便获取。

上面的这些步骤中,通过 createWebApplicationContext 方法创建 WebApplicationContext 对象需要和大家细说下,因为一般情况下就是通过这种方式创建的 WebApplicationContext。我们来看一下相关的方法:

1
2
3
4
5
6
7
8
9
10
11
12
13
14
15
16
17
18
19
20
21
22
23
24
25
26
27
28
29
30
31
32
33
34
35
36
37
38
39
40
41
42
43
44
45
46
47
protected WebApplicationContext createWebApplicationContext(@Nullable ApplicationContext parent) {
Class<?> contextClass = getContextClass();
if (!ConfigurableWebApplicationContext.class.isAssignableFrom(contextClass)) {
throw new ApplicationContextException(
"Fatal initialization error in servlet with name '" + getServletName() +
"': custom WebApplicationContext class [" + contextClass.getName() +
"] is not of type ConfigurableWebApplicationContext");
}
ConfigurableWebApplicationContext wac =
(ConfigurableWebApplicationContext) BeanUtils.instantiateClass(contextClass);
wac.setEnvironment(getEnvironment());
wac.setParent(parent);
String configLocation = getContextConfigLocation();
if (configLocation != null) {
wac.setConfigLocation(configLocation);
}
configureAndRefreshWebApplicationContext(wac);
return wac;
}
protected void configureAndRefreshWebApplicationContext(ConfigurableWebApplicationContext wac) {
if (ObjectUtils.identityToString(wac).equals(wac.getId())) {
// The application context id is still set to its original default value
// -> assign a more useful id based on available information
if (this.contextId != null) {
wac.setId(this.contextId);
}
else {
// Generate default id...
wac.setId(ConfigurableWebApplicationContext.APPLICATION_CONTEXT_ID_PREFIX +
ObjectUtils.getDisplayString(getServletContext().getContextPath()) + '/' + getServletName());
}
}
wac.setServletContext(getServletContext());
wac.setServletConfig(getServletConfig());
wac.setNamespace(getNamespace());
wac.addApplicationListener(new SourceFilteringListener(wac, new ContextRefreshListener()));
// The wac environment's #initPropertySources will be called in any case when the context
// is refreshed; do it eagerly here to ensure servlet property sources are in place for
// use in any post-processing or initialization that occurs below prior to #refresh
ConfigurableEnvironment env = wac.getEnvironment();
if (env instanceof ConfigurableWebEnvironment) {
((ConfigurableWebEnvironment) env).initPropertySources(getServletContext(), getServletConfig());
}
postProcessWebApplicationContext(wac);
applyInitializers(wac);
wac.refresh();
}

这里一共涉及到两个方法:

createWebApplicationContext

首先获取到创建类型,并检查创建类型,没问题的话调用 instantiateClass 方法完成创建工作,然后给创建好的 wac 对象配置各种属性,配置的 configLocation 就是我们在 web.xml 文件中配置的 SpringMVC 配置文件路径,默认的文件路径是 /WEB-INF/[servletName]-servlet.xml

configureAndRefreshWebApplicationContext

configureAndRefreshWebApplicationContext 方法主要也是配置&刷新 WebApplicationContext,在这个方法里会调用 addApplicationListener 为 wac 添加一个监听器,监听的是 ContextRefreshedEvent 事件,当收到该事件后,会调用 FrameworkServlet 的 onApplicationEvent 方法,并在该方法中调用 onRefresh 方法完成刷新,刷新之后,会将 refreshEventReceived 变量标记为 true。

1
2
3
4
5
6
public void onApplicationEvent(ContextRefreshedEvent event) {
this.refreshEventReceived = true;
synchronized (this.onRefreshMonitor) {
onRefresh(event.getApplicationContext());
}
}

这就是 FrameworkServlet#initServletBean 方法的大致工作逻辑。这里涉及到了 onRefresh 方法,但是这是一个空方法,在子类 DispatcherServlet 中实现了,所以接下来我们就来看 DispatcherServlet。

3.DispatcherServlet

这里我们就不废话了,直接来看 onRefresh 方法,如下:

1
2
3
4
5
6
7
8
9
10
11
12
13
14
15
@Override
protected void onRefresh(ApplicationContext context) {
initStrategies(context);
}
protected void initStrategies(ApplicationContext context) {
initMultipartResolver(context);
initLocaleResolver(context);
initThemeResolver(context);
initHandlerMappings(context);
initHandlerAdapters(context);
initHandlerExceptionResolvers(context);
initRequestToViewNameTranslator(context);
initViewResolvers(context);
initFlashMapManager(context);
}

在 onRefresh 方法中调用了 initStrategies 进行初始化操作。initStrategies 的内容其实很简单,就是九个组件的初始化。九个的初始化流程比较类似,这里我们以常见的视图解析器的初始化方法 initViewResolvers 为例,来一起看看初始化流程:

1
2
3
4
5
6
7
8
9
10
11
12
13
14
15
16
17
18
19
20
21
22
23
24
25
26
27
28
29
30
31
private void initViewResolvers(ApplicationContext context) {
this.viewResolvers = null;
if (this.detectAllViewResolvers) {
// Find all ViewResolvers in the ApplicationContext, including ancestor contexts.
Map<String, ViewResolver> matchingBeans =
BeanFactoryUtils.beansOfTypeIncludingAncestors(context, ViewResolver.class, true, false);
if (!matchingBeans.isEmpty()) {
this.viewResolvers = new ArrayList<>(matchingBeans.values());
// We keep ViewResolvers in sorted order.
AnnotationAwareOrderComparator.sort(this.viewResolvers);
}
}
else {
try {
ViewResolver vr = context.getBean(VIEW_RESOLVER_BEAN_NAME, ViewResolver.class);
this.viewResolvers = Collections.singletonList(vr);
}
catch (NoSuchBeanDefinitionException ex) {
// Ignore, we'll add a default ViewResolver later.
}
}
// Ensure we have at least one ViewResolver, by registering
// a default ViewResolver if no other resolvers are found.
if (this.viewResolvers == null) {
this.viewResolvers = getDefaultStrategies(context, ViewResolver.class);
if (logger.isTraceEnabled()) {
logger.trace("No ViewResolvers declared for servlet '" + getServletName() +
"': using default strategies from DispatcherServlet.properties");
}
}
}

一开始的 viewResolvers 变量是一个集合,解析出来的视图解析器对象都将放入这个集合中。

首先判断 detectAllViewResolvers 变量是否为 true,如果为 true,则直接去查找 Spring 容器中的所有视图解析器,将查找结果赋值给 viewResolvers,然后进行排序。默认情况下 detectAllViewResolvers 变量的值为 true,如果有需要,可以在 web.xml 中进行配置,像下面这样:

1
2
3
4
5
6
7
8
9
10
11
12
13
14
15
16
17
<servlet>
<servlet-name>springmvc</servlet-name>
<servlet-class>org.springframework.web.servlet.DispatcherServlet</servlet-class>
<init-param>
<param-name>contextConfigLocation</param-name>
<param-value>classpath:spring-servlet.xml</param-value>
</init-param>
<init-param>
<param-name>detectAllViewResolvers</param-name>
<param-value>false</param-value>
</init-param>
<load-on-startup>1</load-on-startup>
</servlet>
<servlet-mapping>
<servlet-name>springmvc</servlet-name>
<url-pattern>/</url-pattern>
</servlet-mapping>

如果 detectAllViewResolvers 的值为 false,那么接下来就会去 Spring 容器中查找一个名为 viewResolver 的视图解析器,此时查找到的就是一个单独的视图解析器。

一般来说,我们并不需要在 web.xml 中去配置 detectAllViewResolvers 的值,视图解析器有多少个就加载多少个。

举个简单例子,我们在 SpringMVC 的配置文件中可能像下面这样配置视图解析器:

1
2
3
4
<bean class="org.springframework.web.servlet.view.InternalResourceViewResolver" id="viewResolver">
<property name="prefix" value="/WEB-INF/jsp/"/>
<property name="suffix" value=".jsp"/>
</bean>

默认情况下,这个 bean 的 id 有没有都行,如果有,取什么值都可以,反正最终都是通过类型而不是 id 去查找的视图解析器。但是如果你在 web.xml 中将 detectAllViewResolvers 修改为 false,那么这个 bean 的 id 取值就比较重要了,就一定要是 viewResolver。

如果在 Spring 容器中通过这两种方式(通过类型查找或通过 id 查找)都没有找到 ViewResolver 实例,那么会调用 getDefaultStrategies 方法去获取一个默认的 ViewResolver 实例。默认实例的获取方式如下:

1
2
3
4
5
6
7
8
9
10
11
12
13
14
15
16
17
18
19
20
21
22
23
24
25
26
27
28
29
30
31
32
33
34
35
36
37
38
39
40
41
protected <T> List<T> getDefaultStrategies(ApplicationContext context, Class<T> strategyInterface) {
if (defaultStrategies == null) {
try {
// Load default strategy implementations from properties file.
// This is currently strictly internal and not meant to be customized
// by application developers.
ClassPathResource resource = new ClassPathResource(DEFAULT_STRATEGIES_PATH, DispatcherServlet.class);
defaultStrategies = PropertiesLoaderUtils.loadProperties(resource);
}
catch (IOException ex) {
throw new IllegalStateException("Could not load '" + DEFAULT_STRATEGIES_PATH + "': " + ex.getMessage());
}
}
String key = strategyInterface.getName();
String value = defaultStrategies.getProperty(key);
if (value != null) {
String[] classNames = StringUtils.commaDelimitedListToStringArray(value);
List<T> strategies = new ArrayList<>(classNames.length);
for (String className : classNames) {
try {
Class<?> clazz = ClassUtils.forName(className, DispatcherServlet.class.getClassLoader());
Object strategy = createDefaultStrategy(context, clazz);
strategies.add((T) strategy);
}
catch (ClassNotFoundException ex) {
throw new BeanInitializationException(
"Could not find DispatcherServlet's default strategy class [" + className +
"] for interface [" + key + "]", ex);
}
catch (LinkageError err) {
throw new BeanInitializationException(
"Unresolvable class definition for DispatcherServlet's default strategy class [" +
className + "] for interface [" + key + "]", err);
}
}
return strategies;
}
else {
return Collections.emptyList();
}
}

这段代码其实也比较简单,就是通过反射去获取默认的视图解析器。

首先给 defaultStrategies 赋值,defaultStrategies 的值实际上就是从 DispatcherServlet.properties 文件中加载到的,我们来看下这个文件内容:

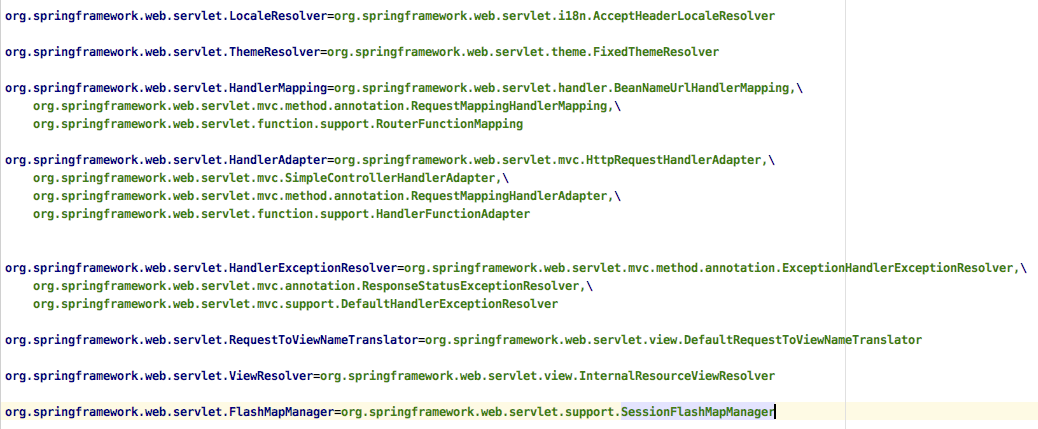
可以看到,这里一共定义了 8 个默认的键值对,有的值是一个,有的值是多个。前面 initStrategies 方法中一共要初始化九个组件,这里默认只定义了 8 个,少了一个 MultipartResolver,这也好理解,并非所有的项目都有文件上传,而且即使有文件上传,用哪一个具体的 MultipartResolver 也不好确定,还是要开发者自己决定。

defaultStrategies 其实加载到的就是这 8 个键值对,其中视图解析器对应的是 org.springframework.web.servlet.view.InternalResourceViewResolver,通过反射创建该类的实例,当 Spring 容器中不存在任何视图解析器的时候,默认的视图解析器即此。

这就是 initViewResolvers 的工作流程,另外 8 个也和它差不多,唯一不同的是 initMultipartResolver,如下:

1
2
3
4
5
6
7
8
private void initMultipartResolver(ApplicationContext context) {
try {
this.multipartResolver = context.getBean(MULTIPART_RESOLVER_BEAN_NAME, MultipartResolver.class);
}
catch (NoSuchBeanDefinitionException ex) {
this.multipartResolver = null;
}
}

可以看到,它只是根据 bean 的名字去查找 bean 实例,没有去查找默认的 MultipartResolver。

说到这里,無名和大家多说一句 SpringMVC 配置中的小细节,

1
2
3
4
5
6
<bean class="org.springframework.web.servlet.view.InternalResourceViewResolver" id="viewResolver">
<property name="prefix" value="/WEB-INF/jsp/"/>
<property name="suffix" value=".jsp"/>
</bean>
<bean class="org.springframework.web.multipart.commons.CommonsMultipartResolver" id="multipartResolver">
</bean>

上面这个关于视图解析器和文件上传解析器的配置,不知道小伙伴们有没有注意过,视图解析器的 id 可有可无,而文件上传解析器的 id 必须是 multipartResolver,回顾我们上面的源码分析,你就知道为啥了!

4.小结

好啦,这就是無名和小伙伴们分享的 SpringMVC 的初始化流程,主要涉及到了 HttpServletBean、FrameworkServlet 以及 DispatcherServlet 三个实例,HttpServletBean 主要是加载 Servlet 配置的各种属性并设置到 Servlet 上;FrameworkServlet 则主要是初始化了 WebApplicationContext;DispatcherServlet 则主要是初始化了自身的九个组件。

这只是初始化的流程,那么当请求到来之后,请求的流程又是怎么样的呢?这个無名下篇文章来和大家分享~好啦,今天就先和小伙伴们聊这么多。


alay

Flame

Hello world!

0 评论
留下评论